


Today I’m going to show you how to automatically mount a drive at boot time in Linux. In most Linux distributions non-boot drives are not mounted when you boot into the system. They do mount when you open them, but it is helpful in many cases to already have the drive mounted when you first boot up your machine.
For example, I have my Backup on one partition and content in another.
!Warning: Doing this requires editing the fstab file in the /etc/ be careful while doing this. Mistakes may cause boot or other issues.
Note: I don't have another drive, So I show in same drive and in different partition.
Identifying the Disk
There are two ways to do this. The first is through a GUI disk manager on your system or through the terminal. I recommend using the terminal, but it’s always good to double-check on a disk manager such as Disks, KDE Partition Manager, or GParted.
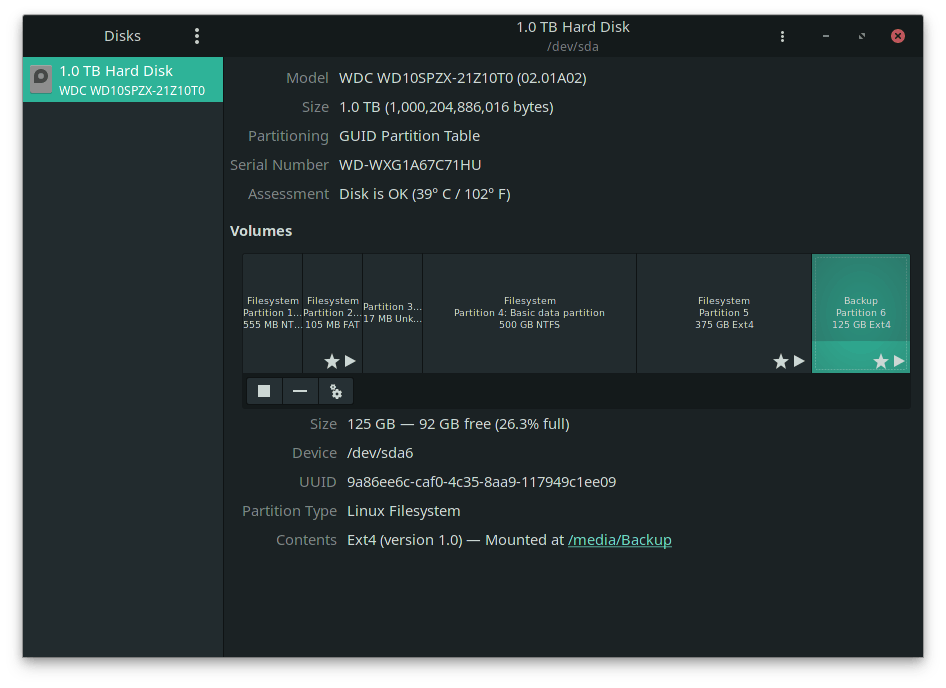
To do this though a program you can open the ‘Disks’ utility and identify the drive. You’re going to want to find the Device, UUID, and the type of file system. For my example, I will be mounting my Backup drive.
Removable Media: Mounting removable storage such as USB’s, SD cards, etc, in fstab will result in an un-bootable system if the removable storage isn’t present and connected at boot time.
Finding the device information though the terminal is very easy and in most cases preferred to using software.
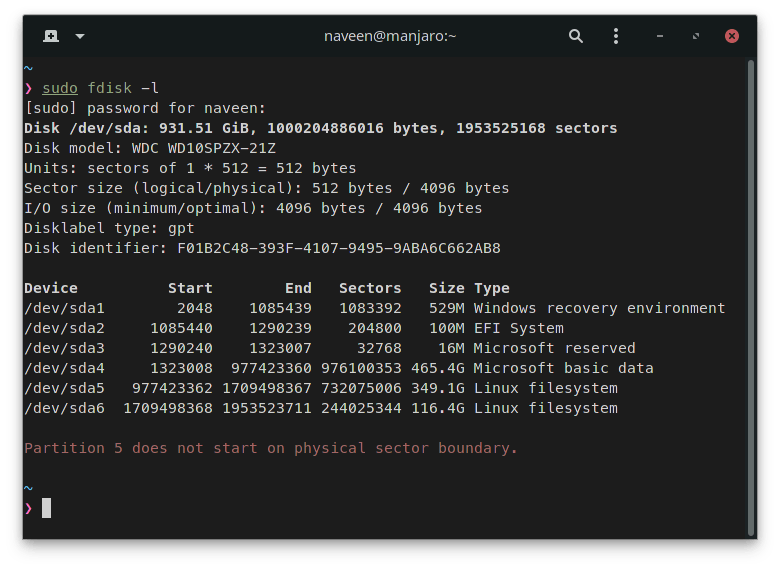
Find the fdisk list command to see all drives and their partitions.
sudo fdisk -l
The blkid command allows you to display information about available block devices. This will allow you to view the file system type, UUID, labels, and more.
sudo blkid
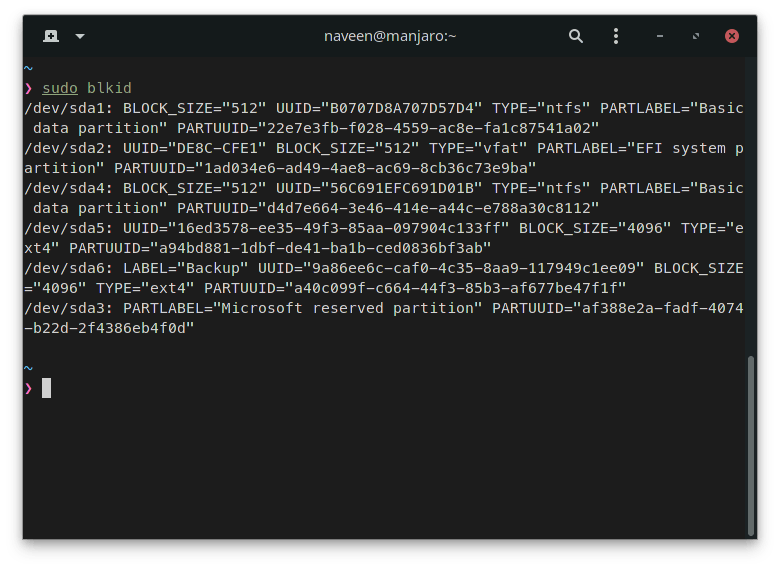
Note down the UUID of the partitions that you want to mount at startup.
Make a Mount Point
Now that you know your disk UUID we will create the mounting directory. You can make this almost anywhere, but it is common practice to do this in the /media folder. Type the following command replacing “Backup” with whatever you want it to be called.
sudo mkdir /media/Backup
Edit /etc/fstab File
We will edit our fstab file. First we need to open the file in nano or whatever editor you want with superuser privileges.
sudo nano /etc/fstab
Now we will input the information of the disk, so it will mount on boot. You need to pay attention to how it is typed. Instead of typing a space make sure you hit tab. I start with a note (anything with a # will be ignored by the system) so it's easy to tell what drive is what. For my example I will type:
# Backup (dev/sda6)
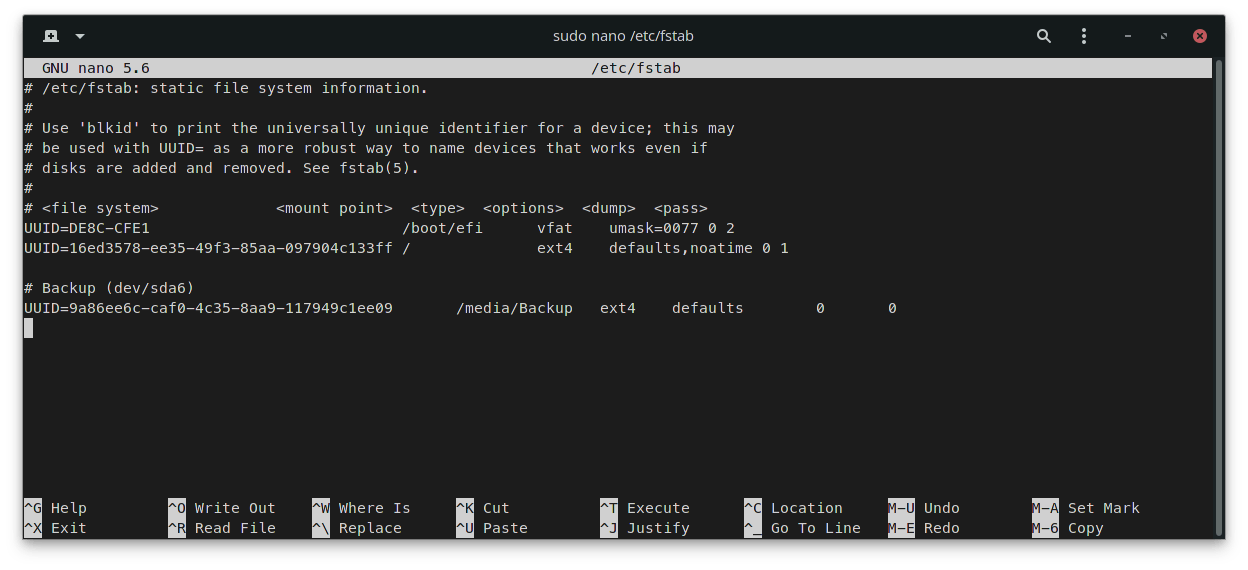
Now the input will look something like this. Be sure to replace the UUID, mount point, and file system type to match your drive. See the image below.
UUID=9a86ee6c-caf0-4c35-8aa9-117949c1ee09 /media/Backup ext4 defaults 0 0
Breaking that line down, we have:
- UUID=9a86ee6c-caf0-4c35-8aa9-117949c1ee09 - is the UUID of the drive. You don't have to use the UUID here. You could just use /dev/sda6, but it's always safer to use the UUID as that will never change.
- /media/Backup - is the mount point for the device.
- ext4 - is the filesystem type.
- defaults - is the default mount settings.
- 0 - determines which filesystem need to be dumped (0 is the default).
- 0 - determine the order in which filesystem checks are done at boot time (0 is the default).
Now we will CTRL-O, and it ENTER to save the file. Reboot your system and it should be mounted!
For our purposes defaults 0 0 will work fine.
Learn more about fstab settings here!
Test fstab
After you edit fstab, enter this command that will mount all drives set to auto-mount. If this gives you any errors ensure you’ve entered everything correctly.
sudo mount -a
If nothing is returned (e.g. no errors) then you should be good to go.
There you go. You should see all the drives you have configured to automatically mount in your system!
For more information follow this link,